Instructions below will show you how to turn a computer into a WiFi hotspot without using a third-party software that may likely eat up memory even after it is closed. Any machine running Windows XP and up, including Windows 8.1 Preview, will work using commands below.
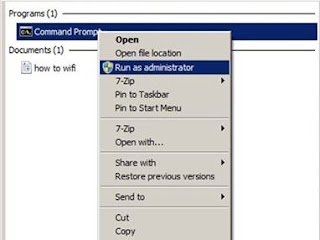
Step 1: Hit the Start button, and type "Command Prompt" or "cmd" on the search box. If your computer is based on Windows 8, you'll need to press the keyboard's Windows logo key to switch to the system's Modern UI Style and type "Command Prompt" or "cmd." Run Command Prompt with admin rights. To do that, right-click on the Command Prompt icon and select "Run as administrator."
 Step 2: Type "netsh wlan show drivers" (without the quotation marks) in Command Prompt to check whether or not your computer supports a hosted network. The "Hosted network supported" field should indicate "Yes" if your unit supports WiFi sharing. If it says "No," you'll have to download the corresponding driver for your WiFi adapter first before proceeding.
Step 3: To create a hotspot, type "netsh wlan set hostednetwork mode=allow ssid=yournetworkname key=yournetworkpassword," and hit Enter on your keyboard.
Remember, "ssid" refers to the WiFi hotspot's name while "key" is said network's password. You can also use the aforementioned command to change the hotspot's name and password.
Step 4: To get the hotspot up and running, type "netsh wlan start hostednetwork." Make sure your computer's WiFi adapter is also switched on, or the hotspot won't work at all.
Step 5: Again, hit the Start button. Type "Network and Sharing Center," and left-click on it. If you're using a Windows-based unit, you probably know what to do by now. (Switch to Modern UI Style, and type "Network and Sharing Center.")
Step 6: Select "Change adapter settings," which can be found on the left-hand side of the window. Both the network connection you want to share and your newly created WiFi hotspot are shown here. Choose the network connection you wish to share. Right click on it, select "Properties," and go to the "Sharing" tab. Check the option "Allow other network users to connect through this computer's Internet connection." This time, select the WiFi hotspot you created earlier.
To turn off your hotspot, type "netsh wlan stop hostednetwork" in Command Prompt.
Keep in mind that you'll have to enter the "netsh wlan start" and "netsh wlan stop" commands in Command Prompt to switch your hotspot on and off, respectively, each time you power on your computer.
A simpler and less time-consuming way to do that is to create shortcuts.
Right-click on the Desktop window, select "New," proceed to clicking "Shortcut." Use this command: "C:\Windows\System32\netsh.exe wlan start hostednetwork" as the location of your shortcut. Choose "Next," rename the shortcut to "Start WiFi hotspot," or call it whatever you want, and select "Finish."
Repeat the same step for the "netsh wlan stop" command shortcut,
but use this command: "C:\Windows\System32\netsh.exe wlan stop hostednetwork" instead.
Step 1: Hit the Start button, and type "Command Prompt" or "cmd" on the search box. If your computer is based on Windows 8, you'll need to press the keyboard's Windows logo key to switch to the system's Modern UI Style and type "Command Prompt" or "cmd." Run Command Prompt with admin rights. To do that, right-click on the Command Prompt icon and select "Run as administrator."

Step 3: To create a hotspot, type "netsh wlan set hostednetwork mode=allow ssid=yournetworkname key=yournetworkpassword," and hit Enter on your keyboard.
Remember, "ssid" refers to the WiFi hotspot's name while "key" is said network's password. You can also use the aforementioned command to change the hotspot's name and password.
Step 4: To get the hotspot up and running, type "netsh wlan start hostednetwork." Make sure your computer's WiFi adapter is also switched on, or the hotspot won't work at all.
A simpler and less time-consuming way to do that is to create shortcuts.
Right-click on the Desktop window, select "New," proceed to clicking "Shortcut." Use this command: "C:\Windows\System32\netsh.exe wlan start hostednetwork" as the location of your shortcut. Choose "Next," rename the shortcut to "Start WiFi hotspot," or call it whatever you want, and select "Finish."
Repeat the same step for the "netsh wlan stop" command shortcut,
but use this command: "C:\Windows\System32\netsh.exe wlan stop hostednetwork" instead.


